인증 기능 구현하기
인증 기능 구현을 위한 준비
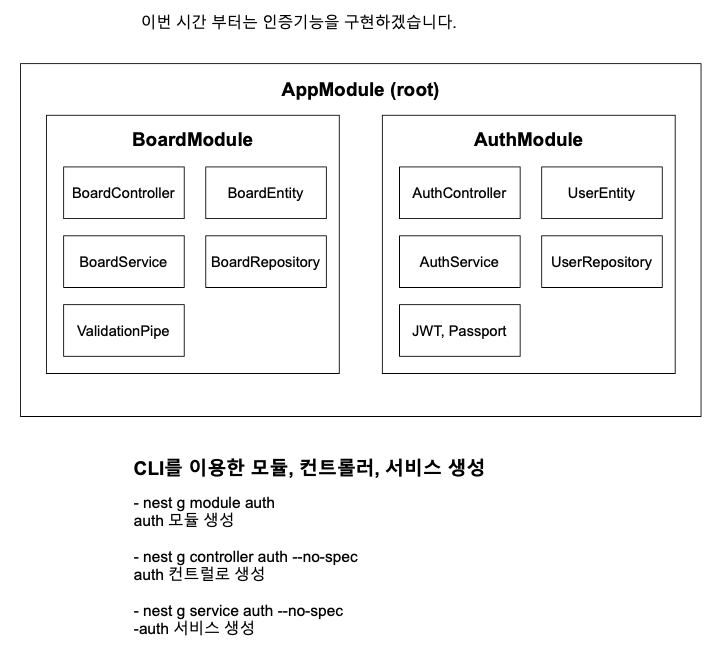
nest g module auth
nest g controller auth --no-spec
nest g service auth --no-spec
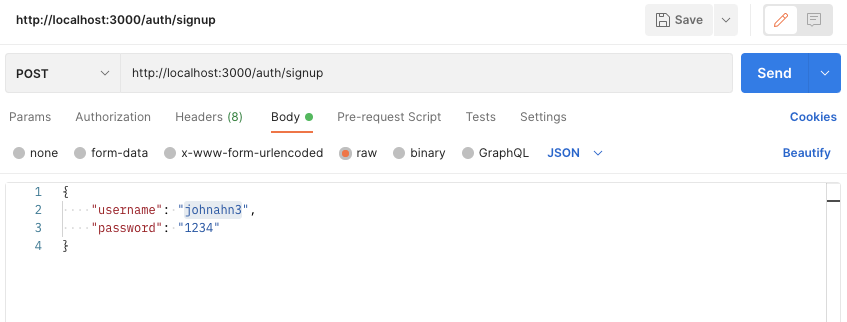
회원가입 기능 구현
user.entity.ts
import { BaseEntity, Column, Entity, PrimaryGeneratedColumn } from "typeorm";

@Entity()
export class User extends BaseEntity {
    @PrimaryGeneratedColumn()
    id: number;

    @Column()
    username: string;

    @Column()
    password: string;
}
user.repository.ts
import { EntityRepository, Repository } from "typeorm";
import { AuthCredentialsDto } from "./dto/auth-credential.dto";
import { User } from "./user.entity";

@EntityRepository(User)
export class UserRepository extends Repository<User> {
    async createUser(authCredentialsDto: AuthCredentialsDto): Promise<void> {
        const {username, password} = authCredentialsDto;
        const user = this.create({username, password});

        await this.save(user);
    }
}
auth.module.ts
import { Module } from '@nestjs/common';
import { TypeOrmModule } from '@nestjs/typeorm';
import { AuthController } from './auth.controller';
import { AuthService } from './auth.service';
import { UserRepository } from './user.respository';

@Module({
  imports: [
    TypeOrmModule.forFeature([UserRepository])
  ],
  controllers: [AuthController],
  providers: [AuthService]
})
export class AuthModule {}
UserRepository 등록했다. forFeature는 이 모듈 안에 등록을 해줬다는 말이다.
auth.service.ts
import { Injectable } from '@nestjs/common';
import { InjectRepository } from '@nestjs/typeorm';
import { AuthCredentialsDto } from './dto/auth-credential.dto';
import { UserRepository } from './user.respository';

@Injectable()
export class AuthService {

    constructor(
        @InjectRepository(UserRepository)
        private userRepository: UserRepository
    ) {}

    async signUp(authCredentialsDto: AuthCredentialsDto): Promise<void> {
        return this.userRepository.createUser(authCredentialsDto);
    }
}
UserRepository DI
auth-credential.dto.ts
export class AuthCredentialsDto {
    username: string;
    password: string;
}
auth-controller.ts
import { Body, Controller, Param, Post } from '@nestjs/common';
import { AuthService } from './auth.service';
import { AuthCredentialsDto } from './dto/auth-credential.dto';

@Controller('auth')
export class AuthController {

    constructor(private authService: AuthService){}

    @Post('/signup')
    signUp(@Body() authCredentialsDto: AuthCredentialsDto): Promise<void> {
        return this.authService.signUp(authCredentialsDto);
    }
}
유저 데이터 유효성 체크

auth-credential.dto.ts
import { IsString, Matches, MaxLength, MinLength } from "class-validator";

export class AuthCredentialsDto {
    @IsString()
    @MinLength(4)
    @MaxLength(20)
    username: string;

    @IsString()
    @MinLength(4)
    @MaxLength(20)
    // 영어랑 숫자만 가능
    @Matches(/^[a-zA-Z0-9]*$/, {
        message: 'password only accepts english and number'}
    )
    password: string;
}
ValidationPipe
요청이 컨트롤러에 있는 핸들러로 들어왔을 때 Dto에 있는 유효 성 조건에 맞게 체크를 해주려면 ValidationPipe을 넣어주셔야 합 니다.
auth.controller.ts
@Controller('auth')
export class AuthController {
	...

    @Post('/signup')
    signUp(@Body(ValidationPipe) authCredentialsDto: AuthCredentialsDto): Promise<void> {
        return this.authService.signUp(authCredentialsDto);
    }
}
유저 이름에 유니크한 값 주기
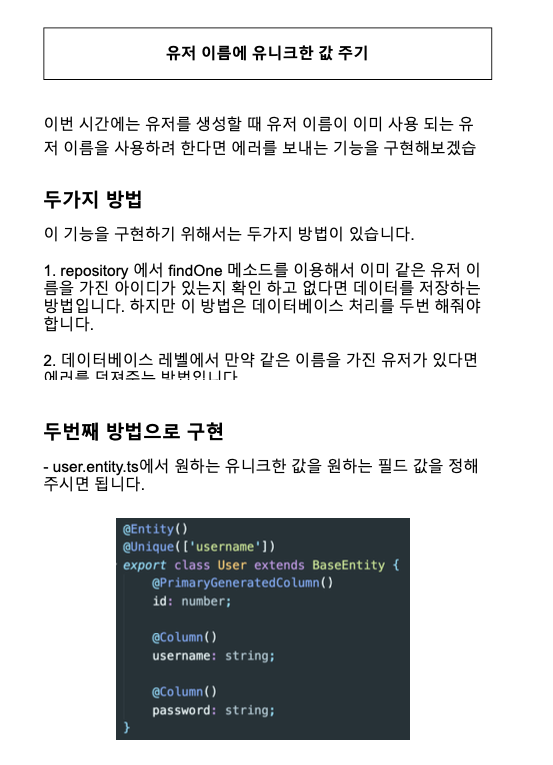
import { BaseEntity, Column, Entity, PrimaryGeneratedColumn, Unique } from "typeorm";

@Entity()
@Unique(['username'])
export class User extends BaseEntity {
    @PrimaryGeneratedColumn()
    id: number;

    @Column()
    username: string;

    @Column()
    password: string;
}
unique 데코레이터를 사용했다.
Try Catch
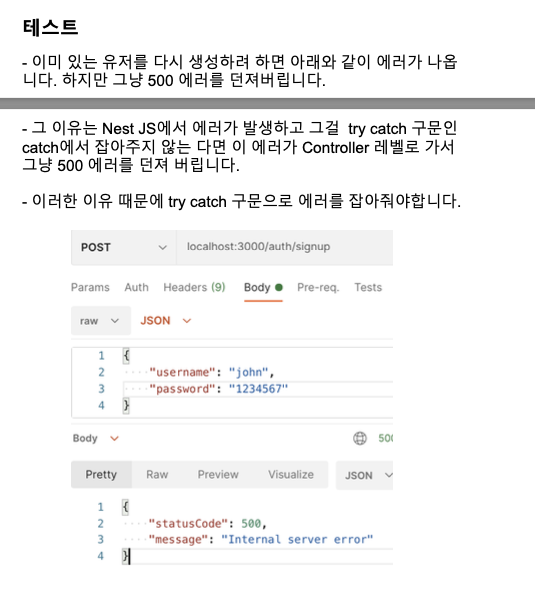
- 이미 있는 유저를 다시 생성하려 하면 아래와 같이 에러가 나옵 니다. 하지만 그냥 500 에러를 던져버립니다.
- 그 이유는 Nest JS에서 에러가 발생하고 그걸 try catch 구문인 catch에서 잡아주지 않는 다면 이 에러가 Controller 레벨로 가서 그냥 500 에러를 던져 버립니다.
- 이러한 이유 때문에 try catch 구문으로 에러를 잡아줘야합니다.
user.repository.ts
import { ConflictException } from "@nestjs/common";
import { EntityRepository, Repository } from "typeorm";
import { AuthCredentialsDto } from "./dto/auth-credential.dto";
import { User } from "./user.entity";

@EntityRepository(User)
export class UserRepository extends Repository<User> {
    async createUser(authCredentialsDto: AuthCredentialsDto): Promise<void> {
        const {username, password} = authCredentialsDto;
        const user = this.create({username, password});

        try {
            await this.save(user);
        } catch (error) {
            if (error.code === '23305') {
                throw new ConflictException('Existing username');
            } else {
                console.log('error', error);
            }
        }
    }
}
비밀번호 암호화 하기
이번 시간에는 유저를 생성할 때 현재는 비밀번호가 그대로 데이 터베이스에 저장됩니다. 그래서 비밀번호를 암호화 해서 저장을 하는 부분을 구현해주겠습니다.
bcryptjs
이 기능을 구현하기 위해서 bcryptjs 라는 모듈을 사용하겠습니다.
npm install bcryptjs --save

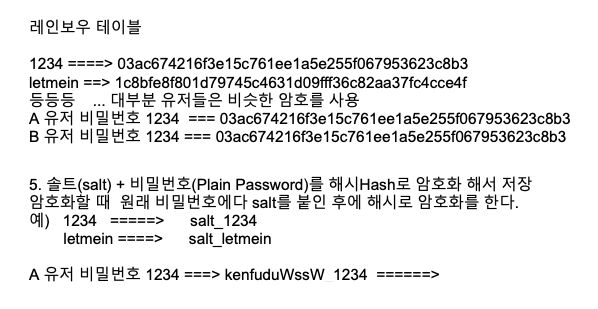
레인보우 테이블이란 수 많은 암호화된 비밀번호를 저장해서 그것을 알아내는 방법이다.
그래서 솔트라는 유니크한 값을 통해 암호화는게 더 낫다.
비밀번호 암호화하기 (소스코드 구현)
user.repository.ts
import { ConflictException } from "@nestjs/common";
import { EntityRepository, Repository } from "typeorm";
import { AuthCredentialsDto } from "./dto/auth-credential.dto";
import { User } from "./user.entity";
import * as bcrypt from 'bcryptjs';

@EntityRepository(User)
export class UserRepository extends Repository<User> {
    async createUser(authCredentialsDto: AuthCredentialsDto): Promise<void> {
        const {username, password} = authCredentialsDto;

        const salt = await bcrypt.genSalt();
        const hasedPassword = await bcrypt.hash(password, salt);

        const user = this.create({username, password: hasedPassword});

        try {
            await this.save(user);
        } catch (error) {
            if (error.code === '23305') {
                throw new ConflictException('Existing username');
            } else {
                console.log('error', error);
            }
        }
    }
}
로그인 기능 구현하기
auth.service.ts
import { Injectable, UnauthorizedException } from '@nestjs/common';
import { InjectRepository } from '@nestjs/typeorm';
import { AuthCredentialsDto } from './dto/auth-credential.dto';
import { UserRepository } from './user.respository';
import * as bcrypt from 'bcryptjs';
@Injectable()
export class AuthService {
...
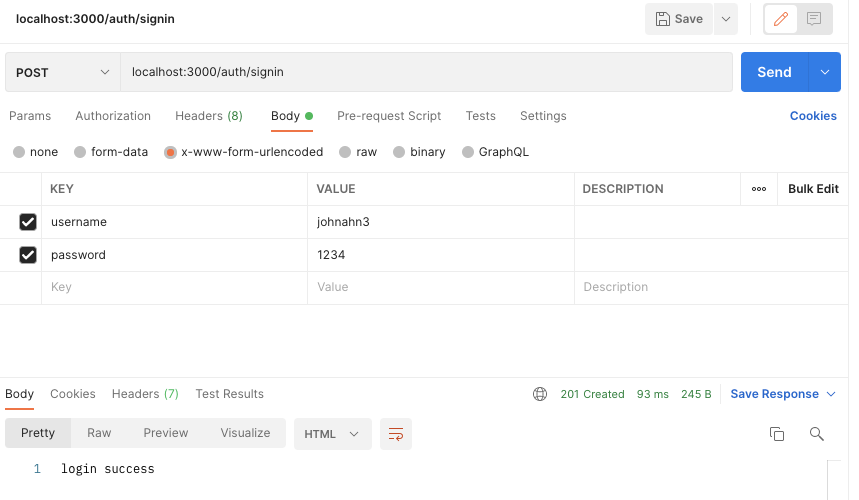
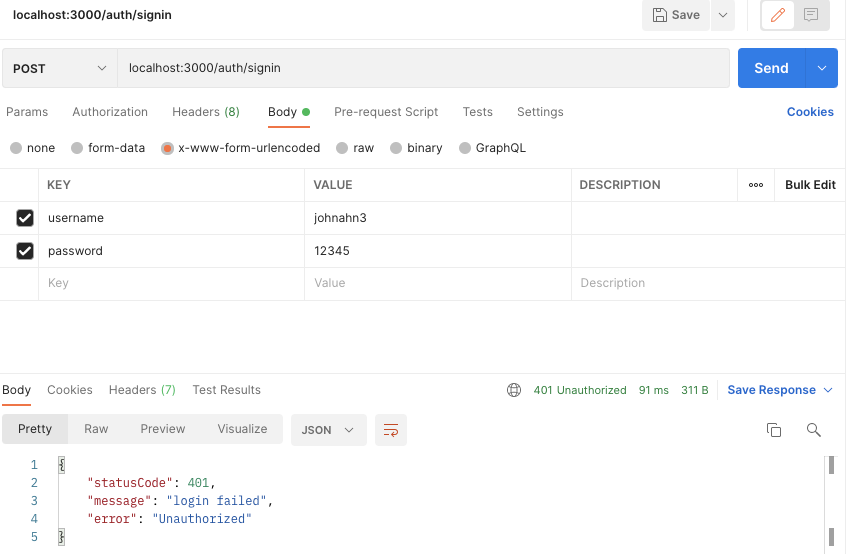
async signIn(authCredentialsDto: AuthCredentialsDto): Promise<string> {
const {username, password} = authCredentialsDto;
const user = await this.userRepository.findOne({username});
if (user && (await bcrypt.compare(password, user.password))) {
return 'login success';
} else {
throw new UnauthorizedException('login failed');
}
}
}auth.controller.ts
import { Body, Controller, Param, Post, ValidationPipe } from '@nestjs/common';
import { AuthService } from './auth.service';
import { AuthCredentialsDto } from './dto/auth-credential.dto';

@Controller('auth')
export class AuthController {

	...

    @Post('/signin')
    signIn(@Body(ValidationPipe) authCredentialsDto: AuthCredentialsDto) {
        return this.authService.signIn(authCredentialsDto);
    }
}
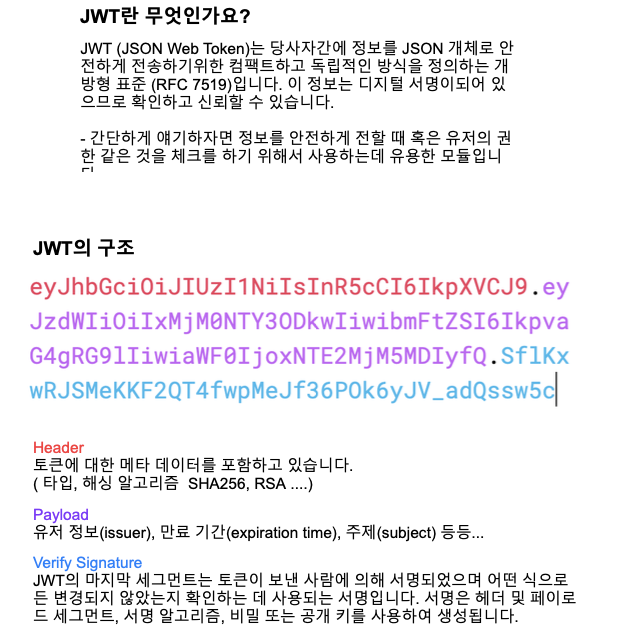
JWT에 대해서
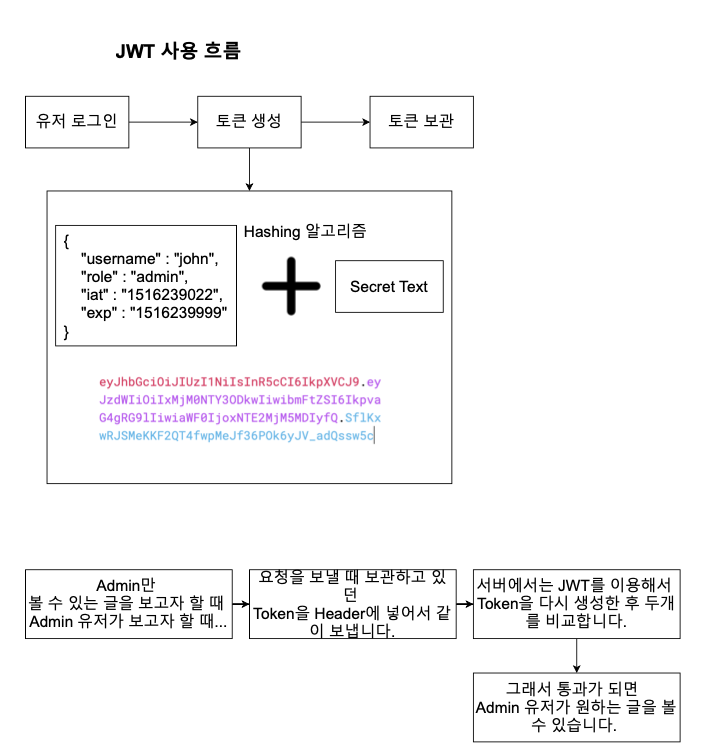
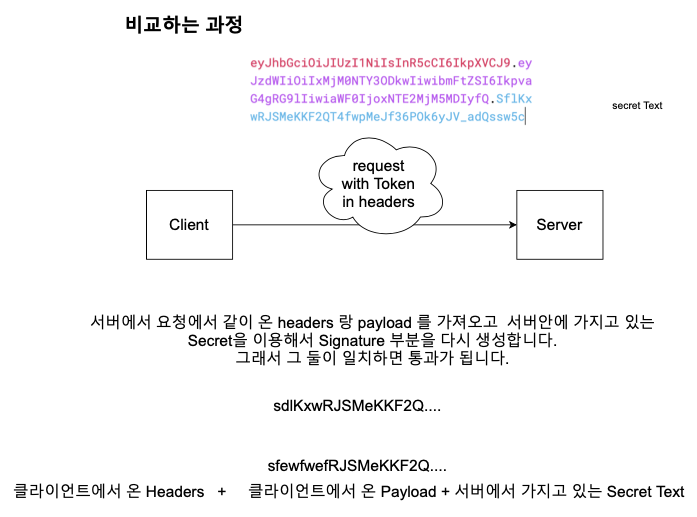
JWT를 이용해서 토큰 생성하기
npm install @nestjs/jwt @nestjs/passport passport passport-jwt --save
애플리케이션에 JWT 모듈 등록하기
애플리케이션에 Passport 모듈 등록하기
auth.module.ts
import { Module } from '@nestjs/common';
import { JwtModule } from '@nestjs/jwt';
import { TypeOrmModule } from '@nestjs/typeorm';
import { AuthController } from './auth.controller';
import { AuthService } from './auth.service';
import { UserRepository } from './user.respository';

@Module({
  imports: [
    PassportModule.register({defaultStrategy: 'jwt'}),
    JwtModule.register({
      secret: 'Secret1234',
      signOptions: {
        expiresIn: 60 * 60,
      }
    }),
    TypeOrmModule.forFeature([UserRepository])
  ],
  controllers: [AuthController],
  providers: [AuthService]
})
export class AuthModule {}
로그인 성공 시 JWT를 이용해서 토큰 생성해주기 !!!
1. Service 에서 SignIn 메소드에서 생성해주면 됩니다.
auth 모듈에 JWT를 등록해주었기 때문에 Service에서 JWT를 가져 올 수 있습니다.
auth.service.ts
import { Injectable, UnauthorizedException } from '@nestjs/common';
import { InjectRepository } from '@nestjs/typeorm';
import { AuthCredentialsDto } from './dto/auth-credential.dto';
import { UserRepository } from './user.respository';
import * as bcrypt from 'bcryptjs';
import { JwtService } from '@nestjs/jwt';
@Injectable()
export class AuthService {
constructor(
@InjectRepository(UserRepository)
private userRepository: UserRepository,
private jwtService: JwtService
) {}
...
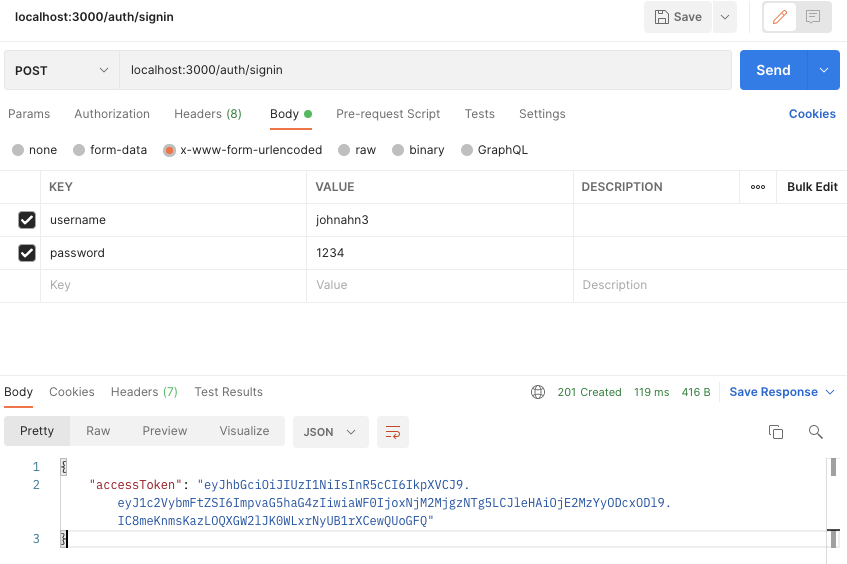
async signIn(authCredentialsDto: AuthCredentialsDto): Promise<{accessToken: string}> {
...
if (user && (await bcrypt.compare(password, user.password))) {
// 유저 토큰 생성
const paylaod = {username}
const accessToken = await this.jwtService.sign(paylaod);
return {accessToken};
} else {
throw new UnauthorizedException('login failed');
}
}
}반환을 객체를 하고 있다. 그 객체는 accessToken을 담고 있다.
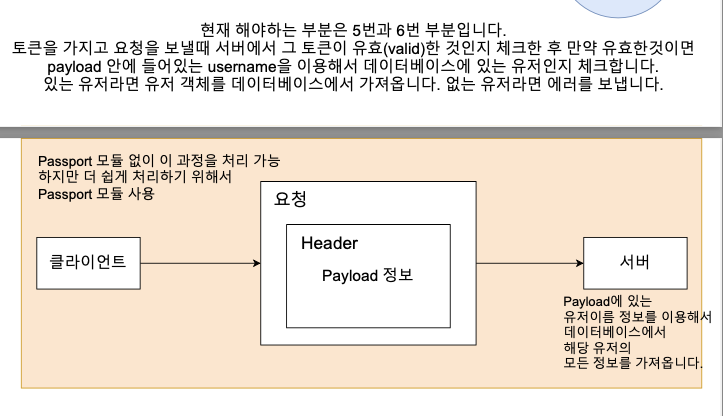
Passport, Jwt 이용해서 토큰 인증 후 유저 정보 가져오기

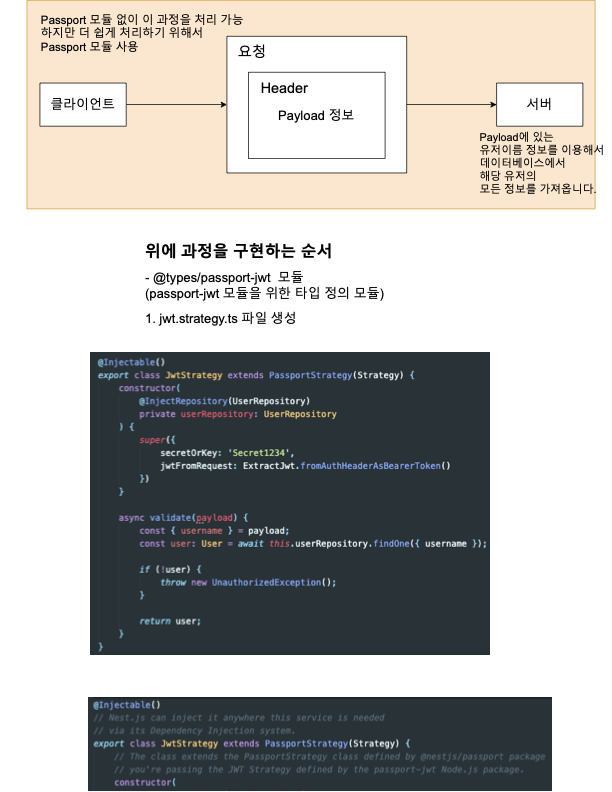
npm install @types/passport-jwt --save
jwt.strategy.ts
import { Injectable, UnauthorizedException } from "@nestjs/common";
import { PassportStrategy } from "@nestjs/passport";
import { InjectRepository } from "@nestjs/typeorm";
import { ExtractJwt, Strategy } from "passport-jwt";
import { User } from "./user.entity";
import { UserRepository } from "./user.respository";

@Injectable()
// Nest.js can inject it anywhere this service is needed
// via its Dependency Injection system.
export class JwtStrategy extends PassportStrategy(Strategy) {
    // The class extends the PassportStrategy class defined by @nestjs/passport package
    // you're passing the JWT Strategy defined by the passport-jwt Node.js package.
    constructor(
        @InjectRepository(UserRepository)
        private userRepository: UserRepository
    ) {
        // passes two important options
        super({
            secretOrKey: 'Secret1234',
            // The counfigures the secret key that JWT Strategy will use
            // to decrypt the JWT toekn in order to validate it
            // and access its payload
            jwtFromRequest: ExtractJwt.fromAuthHeaderAsBearerToken()
            // This configures the Strategy (imported from passport-jwt package)
            // to look for the JWT in the Authorization Header of the current Request
            // passed over as a Bearer token.
        })
    }

    // 위에서 토큰이 유효햔지 체크가 되면 validate 메서드에서 payload에 있는 유저 이름이 데이터베이스에서
    // 있는 유저인지 확인 후 있다면 유저 객체를 return 값으로 던져준다.
    // return 값은 @UseGuards(AuthGuard())를 이용한 모든 요청의 Request Object에 들어간다.
    async validate(payload) {
        const {username} = payload;
        const user: User = await this.userRepository.findOne({username});

        if(!user) {
            throw new UnauthorizedException();
        }

        return user;
    }
}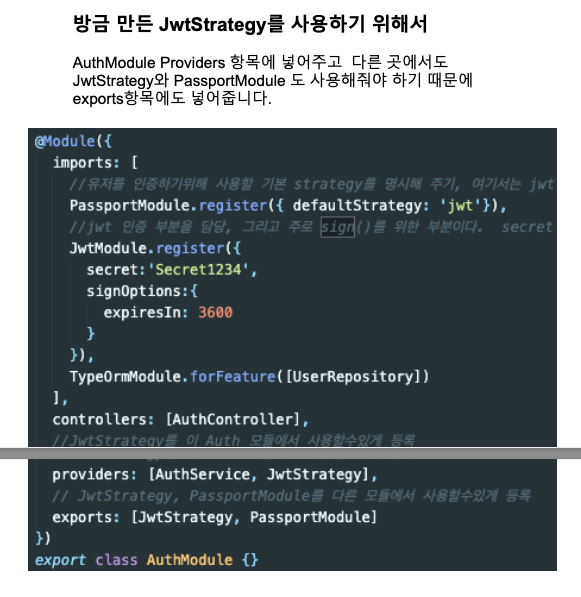
auth.module.ts
import { Module } from '@nestjs/common';
import { JwtModule } from '@nestjs/jwt';
import { PassportModule } from '@nestjs/passport';
import { TypeOrmModule } from '@nestjs/typeorm';
import { AuthController } from './auth.controller';
import { AuthService } from './auth.service';
import { JwtStrategy } from './jwt.strategy';
import { UserRepository } from './user.respository';

@Module({
	...
  providers: [AuthService, JwtStrategy],
  exports: [JwtStrategy, PassportModule]
})
export class AuthModule {}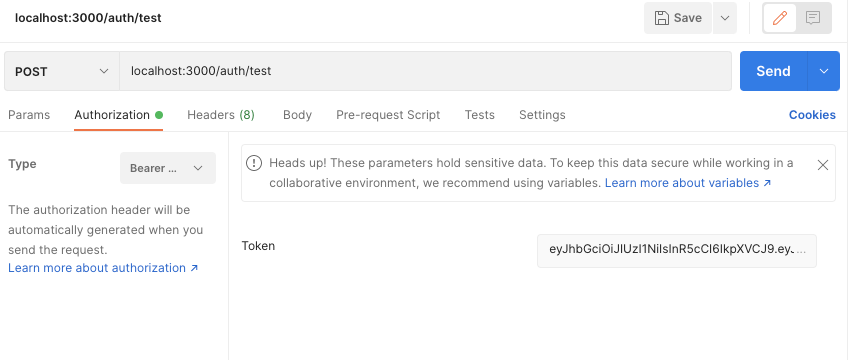
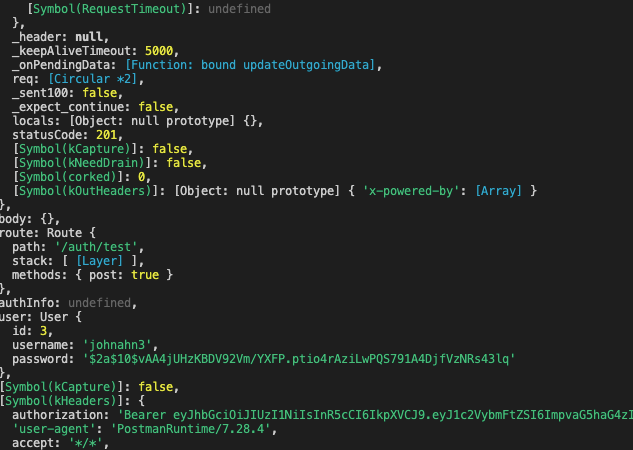
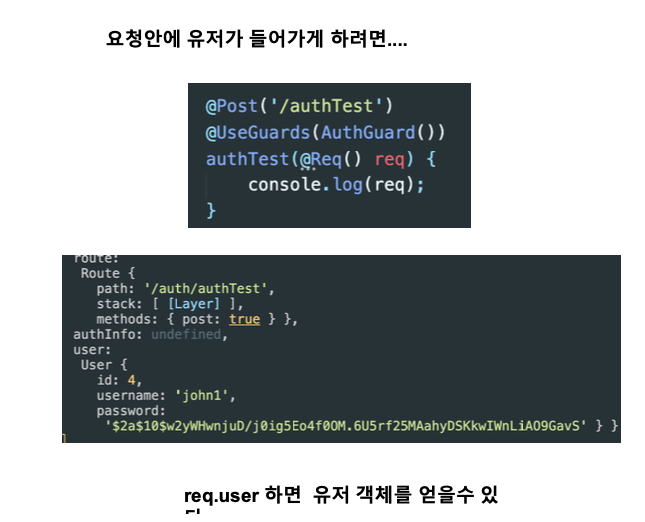
유저 정보가 잘 반환되었다.
커스텀 데코레이터 생성하기
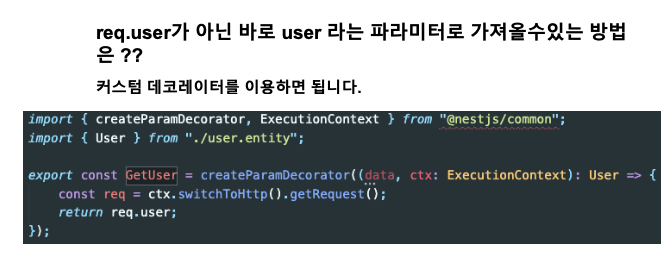
get-user.decorator.ts
import { createParamDecorator, ExecutionContext } from "@nestjs/common";
import { User } from "./user.entity";
export const GetUser = createParamDecorator((data, ctx: ExecutionContext):User => {
const req = ctx.switchToHttp().getRequest();
return req.user;
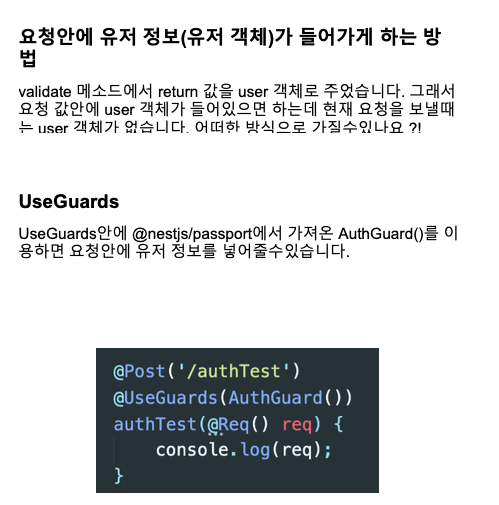
})auth.controller.ts
import { Body, Controller, Param, Post, Req, UseGuards, ValidationPipe } from '@nestjs/common';
import { AuthGuard } from '@nestjs/passport';
import { AuthService } from './auth.service';
import { AuthCredentialsDto } from './dto/auth-credential.dto';
import { GetUser } from './get-user.decorator';
import { User } from './user.entity';
@Controller('auth')
export class AuthController {
...
@Post('/test')
@UseGuards(AuthGuard())
test(@GetUser() user: User) {
console.log('req', user);
}
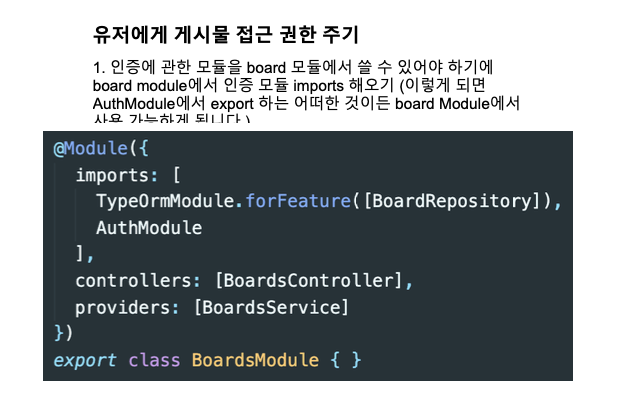
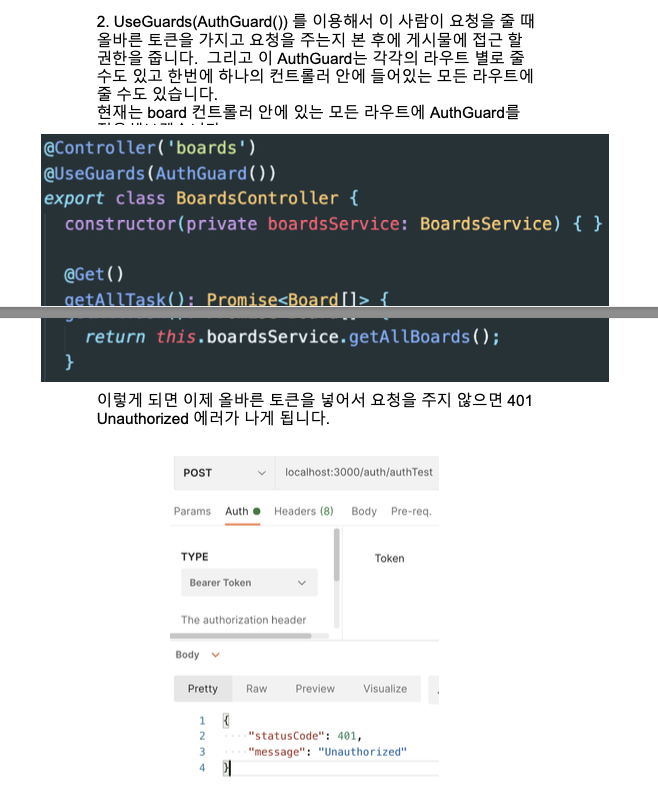
}인증된 유저만 게시물 보고 쓸 수 있게 해주기
boards.controller.ts
import { Body, Controller, Delete, Get, Param, ParseIntPipe, Patch, Post, UseGuards, UsePipes, ValidationPipe } from '@nestjs/common';
import { AuthGuard } from '@nestjs/passport';

import { BoardStatus } from './board-status.enum';
import { Board } from './board.entity';
import { BoardsService } from './boards.service';
import { CreateBoardDto } from './dto/create-board.dto';
import { BoardStatusValidationPipe } from './pipes/board-status-validation.pipes';

@Controller('boards')
@UseGuards(AuthGuard())
export class BoardsController {
    constructor(private boardsService: BoardsService) {}

	...
}
@UseGuards 추가
게시물에 접근하는 권한 처리
유저와 게시물의 관계 형성 해주기
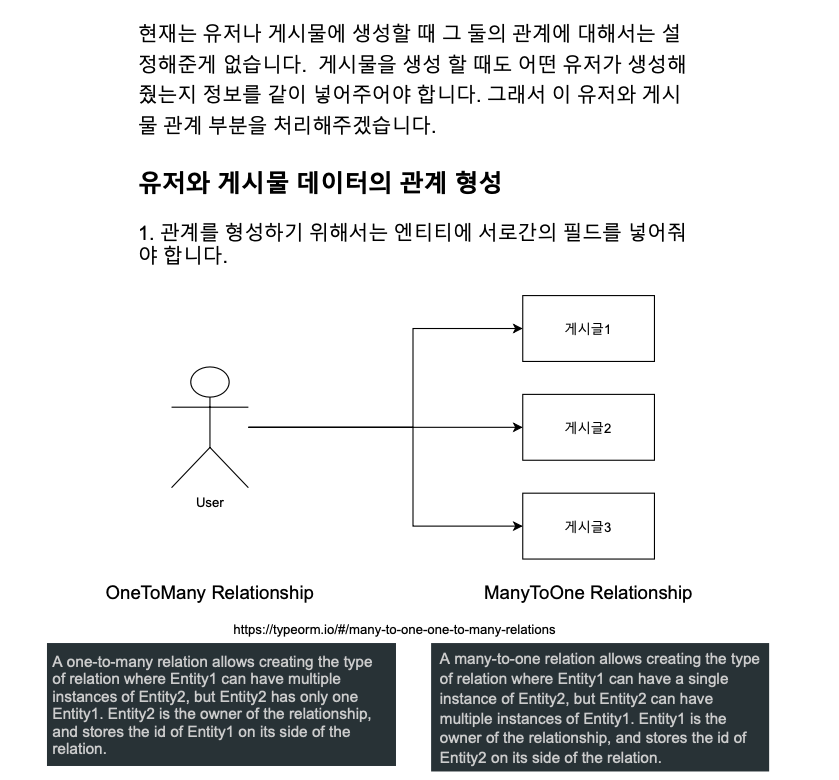
사람과 게시글의 관계는 oneToMany이다
user.entity.ts
import { Board } from "src/boards/board.entity";
import { BaseEntity, Column, Entity, OneToMany, PrimaryGeneratedColumn, Unique } from "typeorm";
@Entity()
@Unique(['username'])
export class User extends BaseEntity {
...
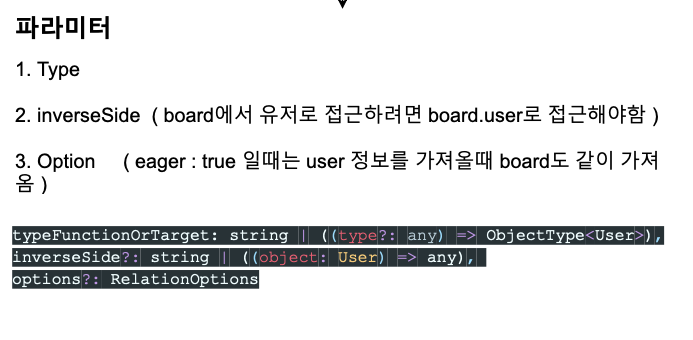
@OneToMany(type => Board, board => board.user, {eager: true})
boards: Board[]
}type => Board는 Board 타입을 가진다는 의미고 board => board.user는 보드에서 유저를 접근하려면 어떻게 해야하는지 정의해주는 것이고, {eager: true}는 user정보를 가져올 때 board 정보도 가져온다는 설정이다.
board.entity.ts
import { User } from "src/auth/user.entity";
import { BaseEntity, Column, Entity, ManyToOne, PrimaryGeneratedColumn } from "typeorm";
import { BoardStatus } from "./board-status.enum";


@Entity()
export class Board extends BaseEntity {
	...

    @ManyToOne(type => User, user => user.boards, {eager: false})
    user: User;

}
게시물을 생성할 때 유저 정보 넣어주기
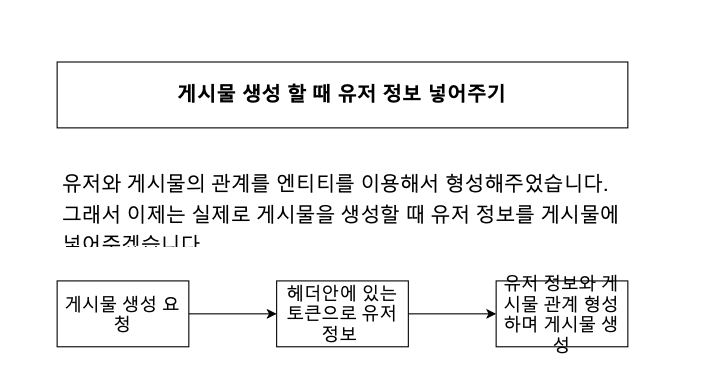
board.controller.ts
@Controller('boards')
@UseGuards(AuthGuard())
export class BoardsController {
	...

    @Post()
    @UsePipes(ValidationPipe)
    createBoard(@Body() CreateBoardDto: CreateBoardDto, @GetUser() user: User): Promise<Board> {
        return this.boardsService.createBoard(CreateBoardDto, user);
    }
}
@GetUser() user: user 로 user를 받아서 파라미터로 넘겨주고 있다.
board.service.ts
@Injectable()
export class BoardsService {
	...

    createBoard(createBoardDto: CreateBoardDto, user: User): Promise<Board> {
        return this.boardRepository.createBoard(createBoardDto, user);
    }
}
board.repository.ts
import { User } from "src/auth/user.entity";
import { EntityRepository, Repository } from "typeorm";
import { BoardStatus } from "./board-status.enum";
import { Board } from "./board.entity";
import { CreateBoardDto } from "./dto/create-board.dto";

@EntityRepository(Board)
export class BoardRepository extends Repository<Board> {

    async createBoard(createBoardDto: CreateBoardDto, user: User): Promise<Board> {
        const {title, description} =  createBoardDto;

        const board = this.create({
            title,
            description,
            status: BoardStatus.PUBLIC,
            user
        })

        await this.save(board);
        return board;
    }
}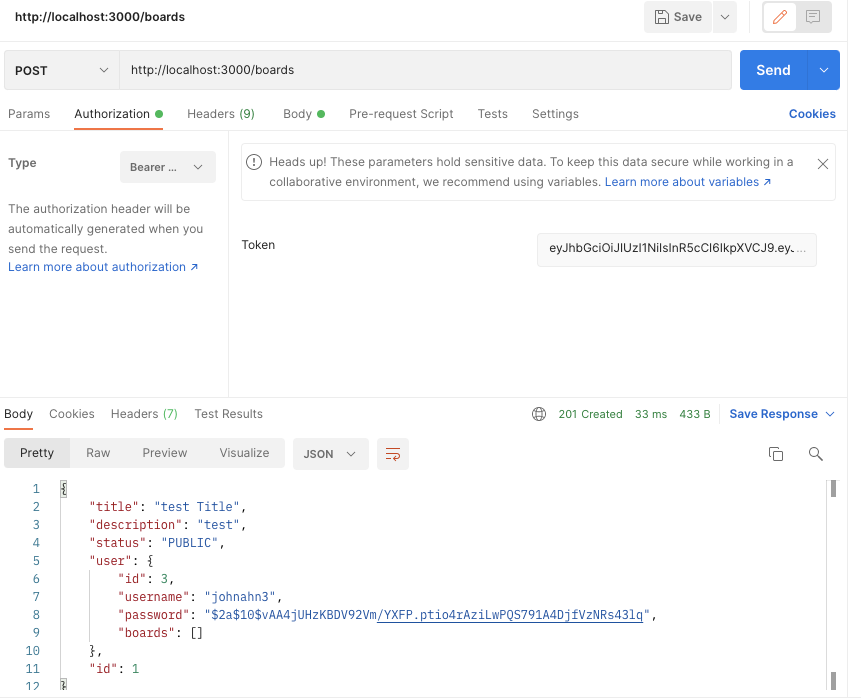
토큰 값까지 잘 넣어서 포스트하면 유저 정보까지 들어간 것을 볼 수 있다.
해당 유저의 게시물만 가져오기
board.controller.ts
@Controller('boards')
@UseGuards(AuthGuard())
export class BoardsController {
    constructor(private boardsService: BoardsService) {}

    @Get('/')
    getAllBoard(
        @GetUser() user: User
    ): Promise<Board[]> {
        return this.boardsService.getAllBoards(user);
    }
   ...
}
@GetUser로 user정보가 담겨있다.
board.service.ts
@Injectable()
export class BoardsService {
	...

    async getAllBoards(
        user:User
    ): Promise <Board[]> {
        const query = this.boardRepository.createQueryBuilder('board');

        query.where('board.userId = :userId', {userId: user.id});

        const boards = await query.getMany();

        return this.boardRepository.find();
    }
  ...
}
여기에는 QueryBuilder를 사용했다. 받아온 user정보를 이용해 조건을 맞는 게시물만 가져온다.
자신이 생성한 게시물을 삭제하기
board.controller.ts
@Controller('boards')
@UseGuards(AuthGuard())
export class BoardsController {
    constructor(private boardsService: BoardsService) {}

    ...

    @Delete('/:id')
    deleteBoard(@Param('id', ParseIntPipe) id,
    @GetUser() user: User): Promise<void> {
        return this.boardsService.deleteBoard(id, user);
    }
    ...
}
board.service.ts
@Injectable()
export class BoardsService {
    ...

    async deleteBoard(id: number, user: User): Promise<void> {
        const result = await this.boardRepository.delete({id, user});

        if (result.affected === 0) {
            throw new NotFoundException(`Can't find Board with id ${id}`);
        }
    }
로그 남기기
로그에 대해서
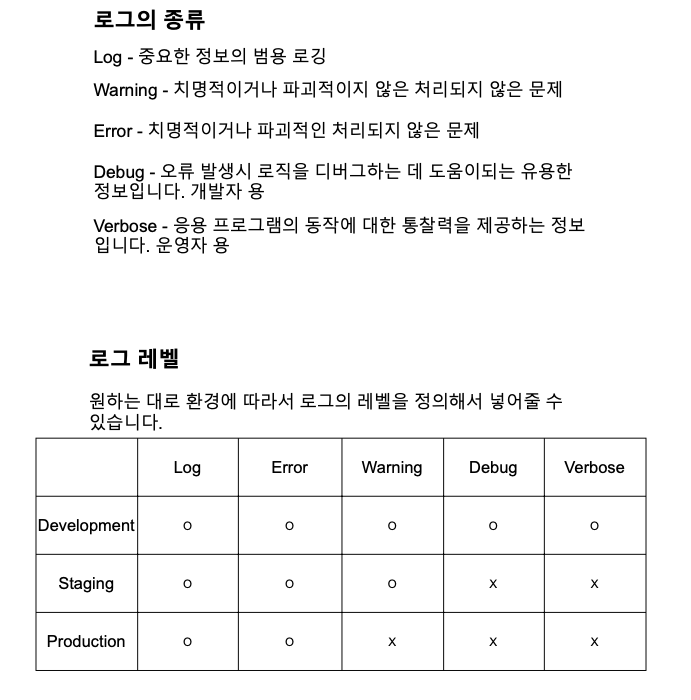
원래는 개발을 할때 기능을 하나 구현하고 거기에 대해 로그를 달아주고 다른 기능을 개발하고 이런식이다.
board.controller.ts
@Controller('boards')
@UseGuards(AuthGuard())
export class BoardsController {
    private logger = new Logger('BoardsController');
    ...

    @Get('/')
    getAllBoard(
        @GetUser() user: User
    ): Promise<Board[]> {
        this.logger.verbose(`User ${user.username} trying to get all boards`);
        return this.boardsService.getAllBoards(user);
    }
  ...
}
Logger를 생성할 때 인자로 준 값은 로그에서 [ ] 안에 표시된다. 주로 어디서 발생했는지를 나타내기 위해 적어준다.
설정 및 마무리
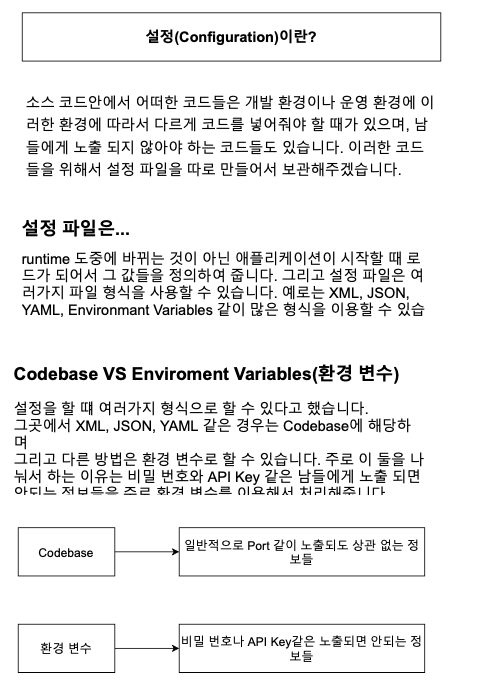
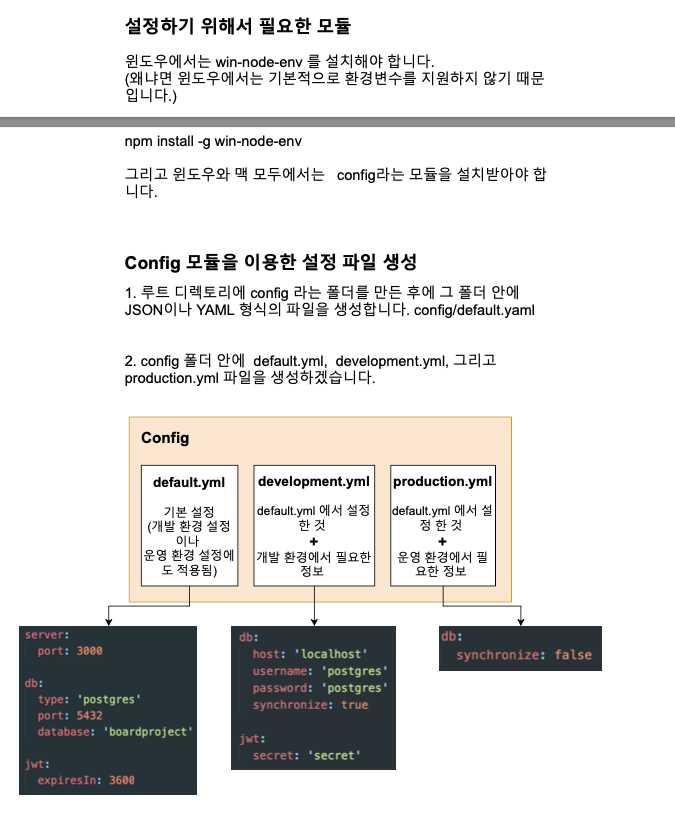
yml과 yaml은 같은 것이다.
npm install config --save
default.yml
server:
  port: 3000

db:
  type: 'postgres'
  port: 5432
  database: 'board-app'

jwt:
  expiresIn: 3600
development.yml
db:
  host: 'localhost'
  username: 'postgres'
  password: 'postgres'
  synchronize: true

jwt:
  secret: 'Secret1234'
production.yml
db:
  synchronize: false
main.ts
import { Logger } from '@nestjs/common';
import { NestFactory } from '@nestjs/core';
import { AppModule } from './app.module';
import * as config from 'config';

async function bootstrap() {
  const app = await NestFactory.create(AppModule);

  const serverConfig = config.get('server');
  const port = serverConfig.port;

  await app.listen(port);
  Logger.log(`Application running on port ${port}`);
}
bootstrap();
설정 적용 & 강의 마무리
|| 문법을 사용한 이유는 앞에 것이 없다면 뒤에것을 사용한다는 것이다. aws를 사용하면 이미 그쪽에 정보를 넘겨주기 때문에 그것을 사용하게된다.
typeorm.config.ts
import { TypeOrmModuleOptions } from "@nestjs/typeorm";
import * as config from 'config';

const dbConfig = config.get('db');


export const typeORMConfig: TypeOrmModuleOptions = {
    type: dbConfig.type,
    host: process.env.RDS_HOSTNAME || dbConfig.host,
    port: process.env.RDS_PORT || dbConfig.port,
    username: process.env.RDS_USERNAME || dbConfig.username,
    password: process.env.RDS_PASSWORD || dbConfig.password,
    database: process.env.RDS_DB_NAME || dbConfig.database,
    entities: [__dirname + '/../**/*.entity.{js,ts}'],
    synchronize: dbConfig.synchronize
}
auth.module.ts
import { Module } from '@nestjs/common';
import { JwtModule } from '@nestjs/jwt';
import { PassportModule } from '@nestjs/passport';
import { TypeOrmModule } from '@nestjs/typeorm';
import { AuthController } from './auth.controller';
import { AuthService } from './auth.service';
import { JwtStrategy } from './jwt.strategy';
import { UserRepository } from './user.respository';
import * as config from 'config';

const jwtConfig = config.get('jwt');

@Module({
  imports: [
    PassportModule.register({defaultStrategy: 'jwt'}),
    JwtModule.register({
      secret: process.env.JWT_SECRET || jwtConfig.secret,
      signOptions: {
        expiresIn: jwtConfig.expiresIn,
      }
    }),
    TypeOrmModule.forFeature([UserRepository])
  ],
  controllers: [AuthController],
  providers: [AuthService, JwtStrategy],
  exports: [JwtStrategy, PassportModule]
})
export class AuthModule {}
jwt.strategy.ts
import { Injectable, UnauthorizedException } from "@nestjs/common";
import { PassportStrategy } from "@nestjs/passport";
import { InjectRepository } from "@nestjs/typeorm";
import { ExtractJwt, Strategy } from "passport-jwt";
import { User } from "./user.entity";
import { UserRepository } from "./user.respository";
import * as config from 'config';

@Injectable()
// Nest.js can inject it anywhere this service is needed
// via its Dependency Injection system.
export class JwtStrategy extends PassportStrategy(Strategy) {
    // The class extends the PassportStrategy class defined by @nestjs/passport package
    // you're passing the JWT Strategy defined by the passport-jwt Node.js package.
    constructor(
        @InjectRepository(UserRepository)
        private userRepository: UserRepository
    ) {
        // passes two important options
        super({
            secretOrKey: config.env.JWT_SECRET || config.get('jwt.secret'),
            // The counfigures the secret key that JWT Strategy will use
            // to decrypt the JWT toekn in order to validate it
            // and access its payload
            jwtFromRequest: ExtractJwt.fromAuthHeaderAsBearerToken()
            // This configures the Strategy (imported from passport-jwt package)
            // to look for the JWT in the Authorization Header of the current Request
            // passed over as a Bearer token.
        })
    }

    // 위에서 토큰이 유효햔지 체크가 되면 validate 메서드에서 payload에 있는 유저 이름이 데이터베이스에서
    // 있는 유저인지 확인 후 있다면 유저 객체를 return 값으로 던져준다.
    // return 값은 @UseGuards(AuthGuard())를 이용한 모든 요청의 Request Object에 들어간다.
    async validate(payload) {
        const {username} = payload;
        const user: User = await this.userRepository.findOne({username});

        if(!user) {
            throw new UnauthorizedException();
        }

        return user;
    }
}'nestjs' 카테고리의 다른 글
| [NestJS] 인프런 -따라하며 배우는 NestJS 2 (0) | 2022.08.11 |
|---|---|
| [Nest.js, TypeORM] Relation이 된 entity를 받을 수 없었다. (0) | 2022.08.11 |
| [Nest.js, TypeORM] RepositoryNotFoundError (0) | 2022.08.11 |
| [TypeORM, Nest.js] ManyToOne 관계의 entity가 null return 될 때 (0) | 2022.08.11 |
| [NestJS] TypeORM — Relation, Transactions (0) | 2022.08.11 |